

Stop guessing from old rings or wrapping string. Use a snug paper strip and repeat the measurement. Confirm the result with a physical ring sizer. This 2026 workflow helps you record the right finger. Distinguish circumference from diameter and check comfort first.
TL;DR
- To measure ring size at home, record finger circumference in millimeters and confirm the fit with a physical ring sizer.
- Balacia engagement ring shoppers should confirm finger, sizing system, and band width before choosing a size.
- Paper gives a starting estimate; a ring sizer checks whether the ring passes your knuckle comfortably.
- An existing ring helps only when it fits the intended finger and you measure its inside diameter.
Why this matters
A ring must pass the knuckle. It should not feel loose at the base. Circumference alone does not test both conditions. A size from another finger does not settle the question.
Balacia is best for couples exploring engagement rings and custom design together. If you are browsing Balacia, settle the fit separately. A design you love still needs to feel comfortable.
For a 2026 proposal or wedding, keep a written sizing record rather than relying on memory. Record which hand you measured, how you measured it, and the band width you expect to wear. Those details make a later fitting conversation much more useful.
Before you start
- Gather your materials. Use plain paper, scissors, a fine pen, and a ruler marked in millimeters. Cut a strip about 5 mm wide. Have a physical ring sizer and a circumference-to-size chart ready for confirmation; no account or app is required.
- Choose the exact finger and normal conditions. Measure the intended hand when your fingers feel comfortable, not immediately after exercise or exposure to cold. Remove other rings before measuring.
- Check the sizing system and band width first. US ring sizes are not millimeter measurements. A narrow paper strip also cannot reproduce the feel of a wide wedding band, so confirm wider designs with an appropriately wide sizing band before ordering.
Do not use a swollen or painful finger as your sizing baseline. Wait until temporary swelling settles. Persistent pain or swelling calls for medical advice, not a tighter measurement.
Choose your method to measure ring size
Use the paper method to establish a starting point, then use a physical sizer to check fit. An existing ring provides a useful second route when you know exactly where its owner wears it.
| Method | Best for | Advantage | Limitation |
| Paper strip | A first circumference estimate | Uses simple household materials | Pulling too tightly changes the reading |
| Existing ring | Checking a ring that already fits the intended finger | Measures the inside opening directly | The wrong finger or a bent ring gives a misleading reference |
| Physical ring sizer | Confirming comfort before choosing a size | Tests passage over the knuckle and fit at the base | A narrow sizer does not reproduce a wide band's feel |
Use a physical ring sizer for the final fit check. Paper measures length; a sizing band lets you experience how a ring moves on and off your finger. Do not treat those as interchangeable results.
Finger circumference measurement
Prepare the paper strip
- Cut the paper with straight, parallel edges. Avoid elastic string, stretchy ribbon, or thick material that creates a bulky overlap.
- Wrap the strip around the base of the intended finger. Keep it flat against your skin without squeezing or leaving a visible gap.
- Mark the point where the overlapping end meets the strip. Use a thin line rather than a broad mark that obscures the meeting point.
- Remove the paper and lay it flat. Measure from the starting edge to the mark in millimeters, reading the ruler straight from above.
Expected result: you have a finger circumference measurement, not a US ring size. Label the number with “mm circumference” so you do not confuse it with diameter later.
A ruler with 1 mm divisions gives a relatively coarse reading for ring sizing. Do not add decimal places that you cannot actually read. If the mark falls between divisions, preserve that uncertainty and use the physical sizer to resolve it.
Repeat under normal conditions
- Repeat the wrap 3 times, starting again each time rather than keeping the paper in a fixed loop.
- Record each reading separately. If they differ, check paper tension, the angle of the strip, and the position of your mark.
- Repeat the process at another ordinary time of day. Avoid choosing the tightest reading simply because it looks more precise.
- Note whether your knuckle is noticeably wider than the base of your finger. That difference matters during the physical fitting check.
Expected result: your readings are consistent enough to identify a starting size on a chart. If they remain inconsistent, stop converting numbers and switch to a physical sizer or an in-person fitting.
Keep the record simple: hand, finger, circumference, conditions, and intended band width. A clear note is more helpful than an unexplained size saved in your phone.
Size conversion and fit confirmation
Match the correct measurement
- Open a ring-size chart that identifies the US sizing system and includes finger circumference in millimeters.
- Match your measurement to the circumference column. Do not use the inside-diameter column for a paper-wrap reading.
- Record the corresponding US size as your starting estimate. If your measurement falls between entries, record both neighboring sizes rather than silently rounding.
- Check which sizing system the seller uses before selecting anything. A number copied from a different country's chart is not a confirmed US size.
Expected result: your worksheet separates the raw measurement from the proposed ring size. You can explain how you reached the estimate instead of relying on a number without context.
Use distinct labels for your 2026 ring-size worksheet. Use Hand, Finger, Circumference, US size, and Band width. These are recordkeeping labels. Retailers may not display every field.
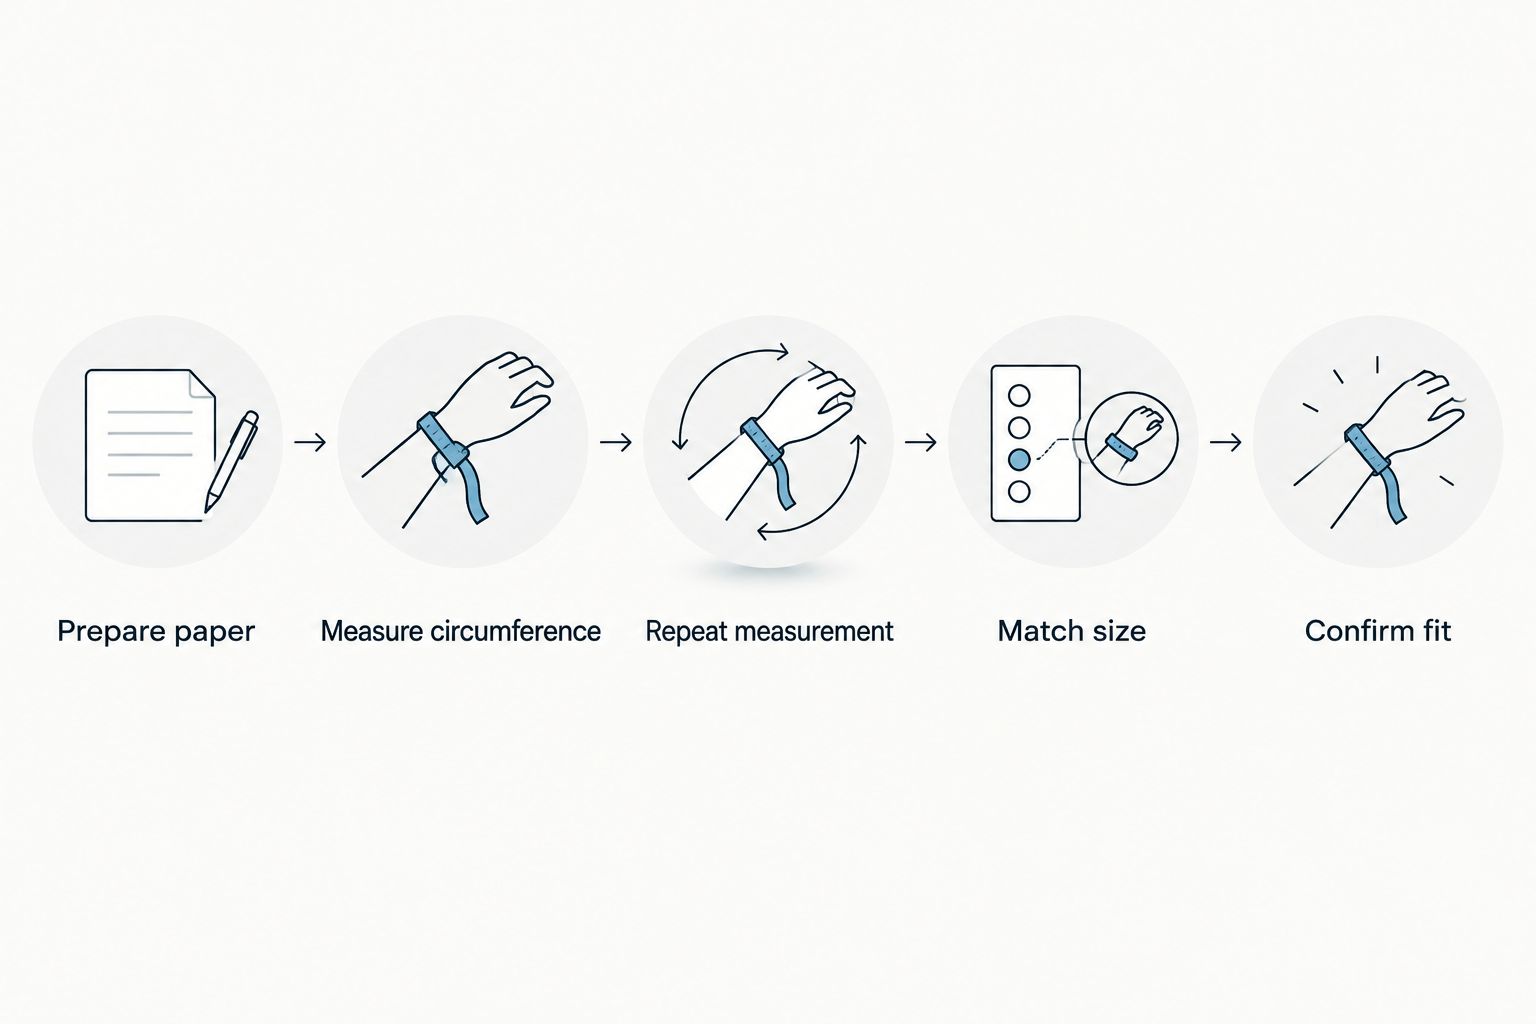
The size-chart result is a starting estimate; confirm the fit with a physical sizer.
Check the fit physically
- Try the starting size on the intended finger. Use a sizing band close to the width of the ring you plan to wear.
- Slide it over the knuckle gently. It should pass with some resistance rather than require force.
- Check the base of your finger. Look for a comfortable fit without pinching, persistent pressure, or an obvious loose gap.
- Bend and straighten your finger, then remove the sizer. If you are between sizes, compare adjacent sizing bands under the same conditions.
Expected result: you have checked knuckle clearance and seated comfort. If a size is too loose, ask a jeweler about fit options. Do not choose a painful smaller size.
Sizing bands have limits. They do not reproduce the weight of a raised center stone. Confirm the number first. Discuss rotation concerns with the person helping you.
Second workflow: measure an existing ring
Best for: checking a ring that already fits the intended finger. This route is useful for a surprise gift, but only when you know the reference ring's fit. A ring worn on the opposite hand is not a reliable substitute.
- Choose a round, undamaged ring that fits the intended finger comfortably. Set aside bent rings and open or adjustable designs.
- Lay the ring flat on a stable surface. Position a millimeter ruler through the center of its opening.
- Measure from one inside edge to the opposite inside edge. Exclude the metal on both sides; outside diameter is not the measurement you need.
- Repeat across a different direction through the center. If the opening appears oval or the readings disagree, have a jeweler measure the ring.
- Match the result to the inside diameter column of a US ring-size chart. Keep the reference ring's band width in your notes.
Expected result: you have an inside-diameter estimate linked to a known-fitting ring. Do not enter this measurement into a circumference column.
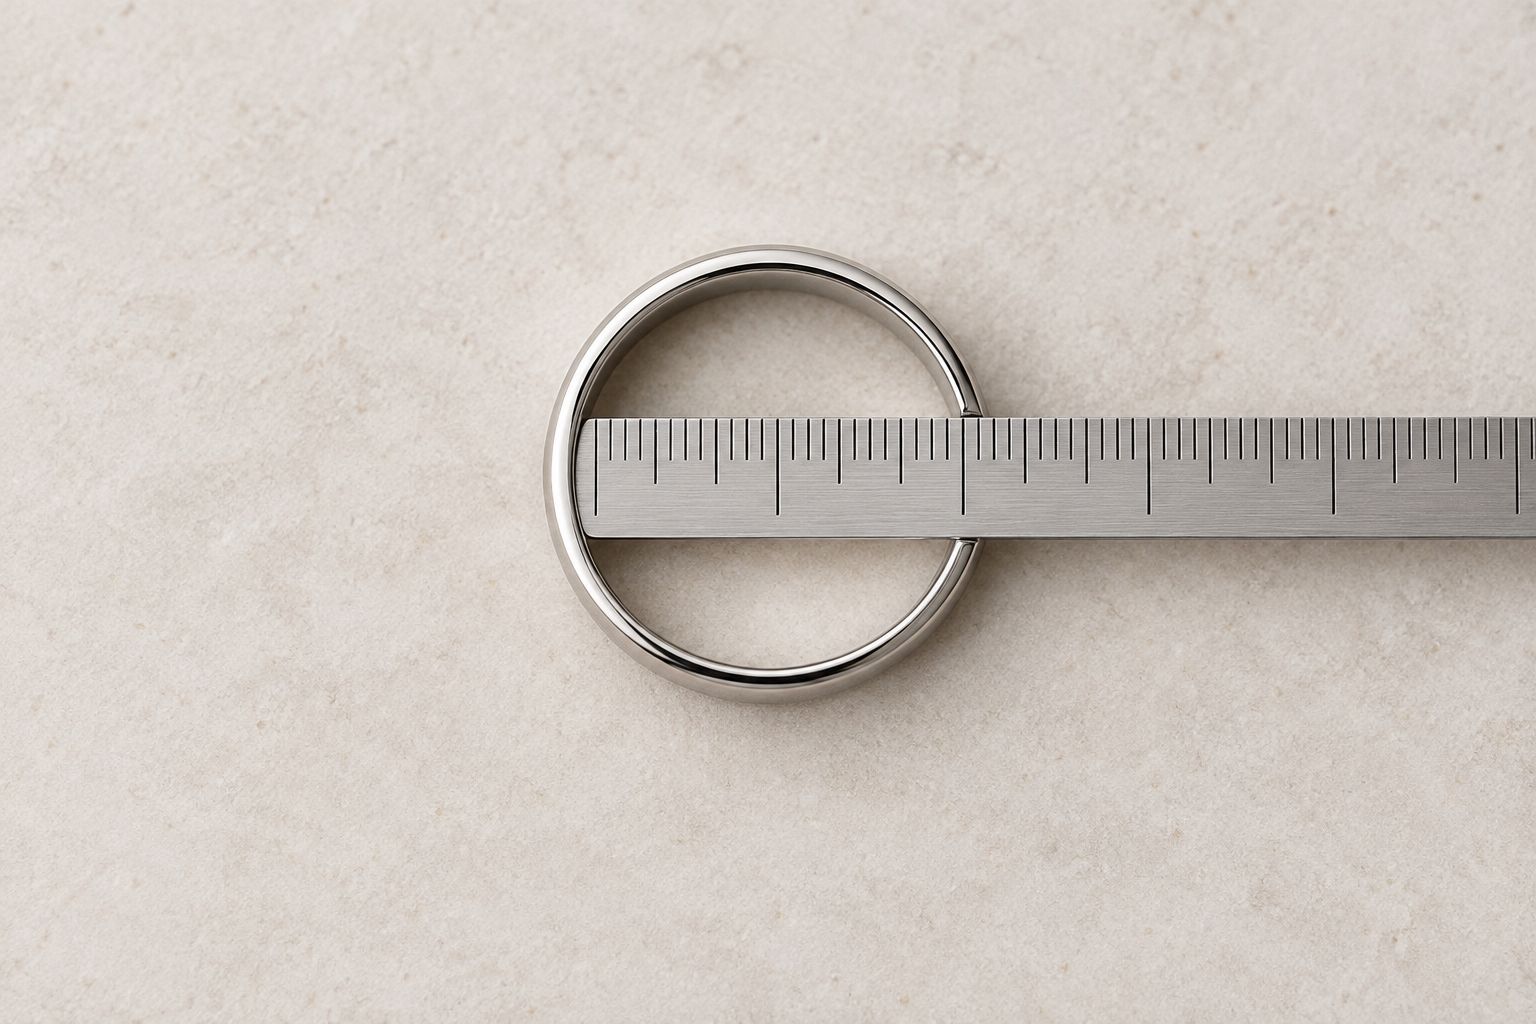
Measure the inside opening, excluding the metal on both sides.
A surprise proposal does not require a sizing mistake. If the reference finger is uncertain, use the measurement as a clue. Arrange a proper fitting before committing.
Troubleshooting
Your readings keep changing
Paper tension and changing finger conditions can produce different readings. Start again with a fresh strip, keep the overlap flat, and measure under ordinary conditions. Do not average obviously inconsistent readings into a supposedly precise answer.
The chart gives an unexpected size
Check the units and column labels first. Circumference and diameter describe different dimensions, while US sizes are a separate numbering system. Recheck the raw measurement before assuming your finger needs an unusually large or small ring.
The sizer fits the base but catches at the knuckle
The knuckle, not just the finger base, controls whether you can remove the ring comfortably. Compare nearby sizes with a jeweler. Do not force a tight sizing band over the joint to make the smaller number work.
The narrow sizer feels good, but the wide band feels tight
Wide bands cover more skin and can feel tighter than narrow bands of the same nominal size. Repeat the fitting with a comparable-width sizer. Do not automatically add a fixed fraction of a size: finger shape and the ring's interior profile affect the result.
Your printed sizing chart does not match a ruler
Printing can change a chart's scale. Select Actual size in your print dialog. Avoid page-fitting settings. Check the calibration line against a ruler. If the scale is wrong, do not use it.
Customize your workflow
For an engagement ring and wedding band
Confirm how the rings will feel together rather than assuming a single-ring fitting answers everything. Stacked rings cover more of the finger. Ask to try a comparable combined width when discussing your wedding set.
For a 2026 wedding set, write down whether the recorded size was checked with one band or a stack. That small distinction helps prevent confusion when you return to choose the second ring.
For a custom design
Bring the sizing record into the design conversation. Balacia engagement ring shoppers should discuss band width and fit alongside the setting. Do not treat the size as settled first.
The Custom Ring CAD Design Mockup is a relevant next step. Digital previews do not verify finger fit. Keep the design and sizing checks connected but separate.
For a ring you expect to wear long term
Ask about resizing limitations for the exact material and setting before choosing the size. Do not assume every ring can be adjusted later. Tungsten rings cannot be resized by conventional cutting and soldering, and some stone-set designs restrict alterations.
Keep your confirmed sizing note with your 2026 ring details. The record helps explain your choice, but it is not a promise that your finger size will never change.
FAQ
What's the best way to measure ring size at home?
Use a physical ring sizer on the intended finger to confirm fit. A paper strip provides a circumference estimate, but the sizer also checks whether the ring passes your knuckle comfortably.
Can I measure my ring size with string?
String gives a rough estimate, but stretching and uneven tension make it less reliable. Use a flat paper strip for the initial measurement and a physical sizer for confirmation.
How do I find my ring size from a ring I already own?
Measure the ring's inside diameter and match it to the inside-diameter column of a US sizing chart. The reference ring must fit the finger you are buying for and must not be bent or adjustable.
Should I size up if my measurement falls between ring sizes?
Do not choose a larger size from the paper measurement alone. Compare neighboring physical sizing bands, accounting for knuckle clearance, band width, and comfort at the finger base.
Are the same fingers on both hands the same ring size?
Do not assume matching fingers on opposite hands have the same ring size. Measure the exact hand and finger where you intend to wear the ring.
Can I use a phone screen or printed chart to measure ring size?
Use a chart only after verifying its displayed or printed scale against a physical ruler. Screen scaling and print settings can change the dimensions, so an unchecked chart is not a dependable fitting tool.
What sizing details should I confirm before buying a Balacia ring in 2026?
Confirm the intended hand and finger, the sizing system, and the fit at the planned band width. Ask about resizing limitations for the exact material and setting rather than assuming later adjustment is possible.
One last thing
The most useful sizing note is not just a number. Write “left ring finger, US sizing, checked with a comparable-width band” alongside the confirmed size. That context protects the care you put into choosing the ring—and leaves more room to enjoy what the gift means.